
Category:
December 15, 2015
Instructions and Tips for using Wise Owl Chalk Synthesis Paint and finishing products
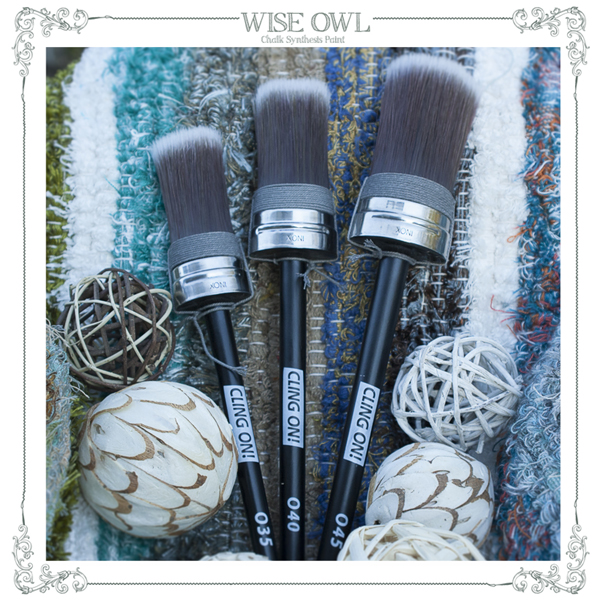
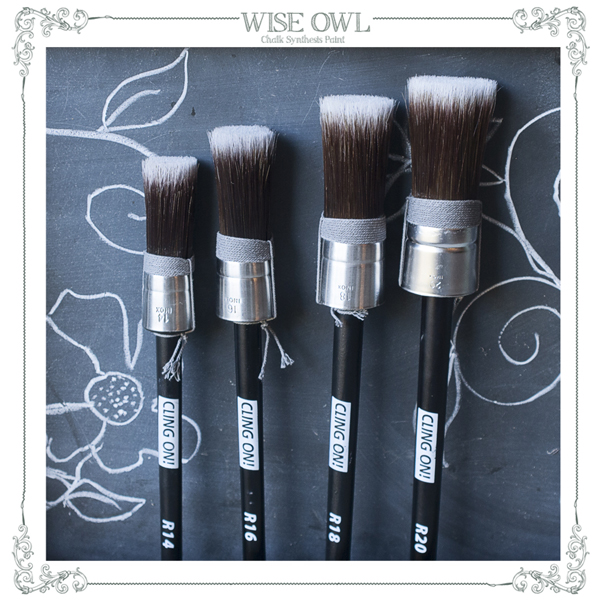
Wise owl Chalk Synthesis Paint is a versatile paint capable of producing a multitude of finishes. This guide will include basic instructions and I will touch on some variations as well as offer tips. Prep: The beauty of chalk style paints is eliminating most of the prep work. All painting must include some prep because you must make sure to thoroughly clean your piece to eliminate product buildup. Furniture polish and waxes are barrier products, and those must be removed to ensure proper adhesion of paint. Clean with a household cleaner than doesn’t include oil. I prefer LA’s totally Awesome found at the Dollar Tree, for especially dirty pieces. It will remove mildew, smoke, product buildup, and more. For pieces that just need a quick cleanup, I go the greener route and use vinegar and water to clean. You may need to sand out any scratches or imperfections but, the paint will smooth out and fill minor scratches. You do not need to sand your piece down to the bare wood or prime. In some cases, laminate furniture may be primed to give a stronger base for adhesion but this is not usually necessary. Some furniture pieces are prone to bleeding through. This is when the tannins in the wood seep through the porous nature of the paint and may stain or discolor. Mahogany, knotty pine, and more are culprits that could produce staining. In this case, a barrier should be used like shellac. You may use shellac right over any areas that you have experienced discoloration and then paint over once covered with a barrier product. Choosing the right brush: There are many brushes designed for furniture painting and you will find it is not always 1 brush fits all. I find myself using an array of sizes and styles from natural bristle to synthetic. The smooth bristles of a synthetic brush, lends itself to a more uniform, minimal brushstroke finish. Natural Bristle brushes are wonderful for creating a textured finish and for dry brushing for shabbier or rustic style finishes. The Cling on brush is an ideal brush for producing the smoothest finish and cuts out time sanding out brushstrokes before adding finishing products. There are multiple styles but the Oval Medium (O40) is the top seller and my personal favorite. Some prefer a flat brush but it is all a matter of preference. I find the oval and round varieties use less paint and can tackle spindles, detail, and legs with ease. A natural bristle brush is my go-to for creating textured finishes. With a natural bristle brush, the less uniform bristle edge, can produce dimension and add a rustic finish. I use a natural bristle brush for pieces that I dry brush (a technique of wisping on just a little paint here and there to create a vintage finish with character.) The HQ may also be used with slightly wet bristles to produce a smoother finish. Try a natural bristle brush for applying Wise Owl Wax. 
 Paint: Shake and stir the paint well. Wise Owl Chalk Synthesis Paint is a mineral paint, and as with all mineral paint, they can settle. Reincorporating the minerals will ensure adhesion to your piece. Dip the tips of the brush only into the paint, do not submerge up to the ferrule to preserve and extend the life of your brush and make cleanup easier. I suggest painting with the grain but you may paint in a cross-hatch pattern to create a unique rustic finish as well. Apply 1 coat and let thoroughly dry before applying a second coat if needed. If you paint over paint that is still drying, it can lift the paint that is in the process of drying. A second coat will be necessary depending on desired finish and which color you are using. Whites, red, and Black require the most coverage due to the nature of pigments. Plan to use more paint if painting with white.
 To sand or not to sand: Since a sealant must be used with Wise Owl Paints, creating a smoother surface for your desired finish can help make application of finishing products more uniform. Chalk style paints are porous and spending a small amount of time lightly sanding for a buttery smooth surface, make application a breeze. It is a common misconception that all pieces painted in a chalk style paint, are rough and gritty. Lightly sanding will guarantee the smoothest feeling surface while preserving the matte vintage style finish of the paint. Some pieces I choose to keep rough and textured when it is the desired finish. I like to use sandpaper or a sanding block of 250 grit or above. The Paint will sand easily and you will not need to devote much time to sanding, go with the grain or direction you painted in. after sanding, you will need to lightly dust off any paint dust with a lint free cloth. Sanding will lighten the color of the paint but don’t worry, this is temporary. The richness of the color will come back once the sealant is applied. Choosing a finishing product: Finishing products are rarely a one size fits all product. We have many finishes depending on your desired finish. First, take into consideration how much traffic the piece will have. Wax produces a gorgeous finish, but high traffic areas like a kitchen table or cabinets may need a finish to hold up to more wear and tear. Wax- The multitude of colors and wax options we offer can create many different finishes. The black hemp oil wax is a personal favorite of mine, I love the richness it adds to the color and it collects in areas of detail to provide additional dimension. The pearl wax is another gorgeous option adding a white wash look with subtle luminescence from the metallic pearl pigment. The clear wax is best on whites if the white finish doesn’t warrant antiquing or aging in any way. It will not change or yellow the color. The hemp oil wax is a buttery smooth wax that has easy application and a strong finish. Because our hemp oil wax is a natural hemp oil shade (a rich olive oil color) it could potentially change the finishes on whites. It is ideal on all other colors and just adds a slight richness to color. Hemp oil waxes are the strongest waxes because the hemp oil will penetrate through the paint and cure to a strong finish, protecting your piece. Wax may need to be reapplied depending on use, throughout the years to maintain a lasting finish.
  Wax Instructions: Use wax at room temperature. If your wax is too cold, application will be difficult as the wax is at its ideal workability is at room temp. You may use a rag to apply wax but the preferred method is using a round natural bristle brush for application. This will make quick work of waxing while creating more uniform coverage. Swirl your natural bristle brush in the wax a few times until you can just barely see the wax on the tips of bristles. A little goes a long way so save your elbow grease and cut out buffing time later. You may wax in circles or with the grain but work in small sections by applying the wax and buffing off with a lint free cloth. An old t-shirt will do but if you are waxing a piece painted in black, use a dark t-shirt, and use a white t-shirt on whites. This will help eliminate visible lint from showing up in your wax finish. To buff off, wipe the wax off until it no longer feels tacky. Move on to the next small section and continue until you have waxed all painted areas. The wax will continue to cure to its strongest finish over the period of 2 weeks-30 days depending on environment and relative humidity. You may use your piece while you are waiting for it to cure, just know, it is at it strongest protective quality after the waxes and oils are able to re-harden within the paint. You may layer waxes of different shades to create your desired look. Remember, wax is last! Since wax is a barrier product, you will not be able to polyurethane over wax. Should you decide to paint over a waxed finish, lightly sand and clean well to remove wax buildup. Hemp Oil: Hemp oil is an ideal sealant and this stuff is magic! If you desire a buttery smooth finish with a tenacity that rivals poly for protection and is even suitable for outdoor furniture, hemp oil may be your best option. Once again, hemp oil is a rich natural hemp color that can range from rich olive oil to amber depending on the season it was collected in. This makes it suitable for colors besides white since it can antique or discolor whites lightly (Unless you are going for that look then go for it!) Hemp oil is a natural fungicide with anti-microbial properties that richens wood and makes a killer strong paint sealant. Hemp oil is great to re-hydrate, protect and richen raw wood, sealing stained pieces instead of using a polyurethane, shining up wood sealed with a poly, or for removing patina from hardware. If using hemp oil on a heavily distressed piece, you will find it penetrating through the wood finish beneath and adding richness and beauty to it. The key to finishing a painted piece with hemp oil is wet sanding.
  To wet sand with hemp oil- This process cuts out a couple steps since you are sanding, distressing, and sealing in a single step. Once your paint is fully dry apply hemp oil in small sections. You may apply with a paintbrush, a sock, applied directly on the sanding block or paper, or squirted right on your painted piece. Once applied, sand the oil into the surface of the paint working in circles. If a distressed finish is desired, use the hemp oil and sand paper to remove paint where you would like to distress. This can create a dimensional look unlike sanding alone. Once you have sanded, buff well with a lint free cloth. Make sure to remove all surface hemp oil until it no longer feels tacky or wet at all. If you leave too much hemp oil on surface, it will become sticky as it cures and hardens. If any part of the finish looks uneven, then the hemp oil was not able to fully saturate the paint. Just apple a little more, sand lightly and buff off. A little goes a long way but you want to make sure the paint and wood can absorb enough oil to ensure a strong and even protective finish. The hemp oil will harden within the paint within 2 weeks-30 days. The process of curing happens as the oil emulsifies with the paint and becomes hard similar to tung oil. The advantage to hemp oil over tung oil is it never spoils over time. If shouldn’t need additional hemp oil for protection but if you feel it needs a light sprucing up, you may apply with a rag and buff lightly. This is especially helpful with outdoor pieces. You may still wax over hemp oil if you desire color from a wax finish, but it will not absorb as heavily as a painted alone piece and would be a subtle finish.
  Glaze: Glaze adds a unique antique finish to painted pieces. If you desire a less uniform look than paint alone, or have a piece with lots of detail, glaze may be a good choice for your piece. Our Black Walnut Glaze is a favorite and adds a rich dark brown patina to pieces. You may also glaze over a surface finished with polyurethane, or over a raw wood finish as an alternative to a gel stain. To glaze over paint, sand well! This is one time when it is absolutely necessary to create a smooth finish before beginning. Sanding your paint will close some of the pore space so the glaze will absorb in a more uniform finish and allow the glaze to glide over when wiping away. To apply glaze, work in small sections. I recommend practicing on a smaller piece or frame before taking on glazing a huge piece as you perfect your desired technique. Apply the glaze in the direction you painted, with a sock or a paint brush. After applying, immediately wipe away glaze until desired finish is achieved. Work quickly and do not try to wipe glaze after it has begun drying. Remember, glaze will remove glaze so if you overlap over glaze that is in the process of drying, you can pull up some of the glaze. This is ok, but to get a more uniform look, quickness is key. If you aren’t happy with an area you have glazed, you may add a little more glaze and wipe away to remove some of the previous finish. Allow the glaze to settle and stay in areas with detail to add a dimensional look. A second layer of glaze may be added once dry if more dramatic finish is desired. You can apply with a sock on your hand and wipe off with another sock on the other hand for quick easy application. Our glaze itself is a strong sealant, but depending on the amount of glaze left on surface, you may need to apply a wax or polyurethane for extra protection. Our glaze can be painted over once dry without any issues should you decide to change the finish.


Self leveling
 Paint: Shake and stir the paint well. Wise Owl Chalk Synthesis Paint is a mineral paint, and as with all mineral paint, they can settle. Reincorporating the minerals will ensure adhesion to your piece. Dip the tips of the brush only into the paint, do not submerge up to the ferrule to preserve and extend the life of your brush and make cleanup easier. I suggest painting with the grain but you may paint in a cross-hatch pattern to create a unique rustic finish as well. Apply 1 coat and let thoroughly dry before applying a second coat if needed. If you paint over paint that is still drying, it can lift the paint that is in the process of drying. A second coat will be necessary depending on desired finish and which color you are using. Whites, red, and Black require the most coverage due to the nature of pigments. Plan to use more paint if painting with white.
 To sand or not to sand: Since a sealant must be used with Wise Owl Paints, creating a smoother surface for your desired finish can help make application of finishing products more uniform. Chalk style paints are porous and spending a small amount of time lightly sanding for a buttery smooth surface, make application a breeze. It is a common misconception that all pieces painted in a chalk style paint, are rough and gritty. Lightly sanding will guarantee the smoothest feeling surface while preserving the matte vintage style finish of the paint. Some pieces I choose to keep rough and textured when it is the desired finish. I like to use sandpaper or a sanding block of 250 grit or above. The Paint will sand easily and you will not need to devote much time to sanding, go with the grain or direction you painted in. after sanding, you will need to lightly dust off any paint dust with a lint free cloth. Sanding will lighten the color of the paint but don’t worry, this is temporary. The richness of the color will come back once the sealant is applied. Choosing a finishing product: Finishing products are rarely a one size fits all product. We have many finishes depending on your desired finish. First, take into consideration how much traffic the piece will have. Wax produces a gorgeous finish, but high traffic areas like a kitchen table or cabinets may need a finish to hold up to more wear and tear. Wax- The multitude of colors and wax options we offer can create many different finishes. The black hemp oil wax is a personal favorite of mine, I love the richness it adds to the color and it collects in areas of detail to provide additional dimension. The pearl wax is another gorgeous option adding a white wash look with subtle luminescence from the metallic pearl pigment. The clear wax is best on whites if the white finish doesn’t warrant antiquing or aging in any way. It will not change or yellow the color. The hemp oil wax is a buttery smooth wax that has easy application and a strong finish. Because our hemp oil wax is a natural hemp oil shade (a rich olive oil color) it could potentially change the finishes on whites. It is ideal on all other colors and just adds a slight richness to color. Hemp oil waxes are the strongest waxes because the hemp oil will penetrate through the paint and cure to a strong finish, protecting your piece. Wax may need to be reapplied depending on use, throughout the years to maintain a lasting finish.
  Wax Instructions: Use wax at room temperature. If your wax is too cold, application will be difficult as the wax is at its ideal workability is at room temp. You may use a rag to apply wax but the preferred method is using a round natural bristle brush for application. This will make quick work of waxing while creating more uniform coverage. Swirl your natural bristle brush in the wax a few times until you can just barely see the wax on the tips of bristles. A little goes a long way so save your elbow grease and cut out buffing time later. You may wax in circles or with the grain but work in small sections by applying the wax and buffing off with a lint free cloth. An old t-shirt will do but if you are waxing a piece painted in black, use a dark t-shirt, and use a white t-shirt on whites. This will help eliminate visible lint from showing up in your wax finish. To buff off, wipe the wax off until it no longer feels tacky. Move on to the next small section and continue until you have waxed all painted areas. The wax will continue to cure to its strongest finish over the period of 2 weeks-30 days depending on environment and relative humidity. You may use your piece while you are waiting for it to cure, just know, it is at it strongest protective quality after the waxes and oils are able to re-harden within the paint. You may layer waxes of different shades to create your desired look. Remember, wax is last! Since wax is a barrier product, you will not be able to polyurethane over wax. Should you decide to paint over a waxed finish, lightly sand and clean well to remove wax buildup. Hemp Oil: Hemp oil is an ideal sealant and this stuff is magic! If you desire a buttery smooth finish with a tenacity that rivals poly for protection and is even suitable for outdoor furniture, hemp oil may be your best option. Once again, hemp oil is a rich natural hemp color that can range from rich olive oil to amber depending on the season it was collected in. This makes it suitable for colors besides white since it can antique or discolor whites lightly (Unless you are going for that look then go for it!) Hemp oil is a natural fungicide with anti-microbial properties that richens wood and makes a killer strong paint sealant. Hemp oil is great to re-hydrate, protect and richen raw wood, sealing stained pieces instead of using a polyurethane, shining up wood sealed with a poly, or for removing patina from hardware. If using hemp oil on a heavily distressed piece, you will find it penetrating through the wood finish beneath and adding richness and beauty to it. The key to finishing a painted piece with hemp oil is wet sanding.
 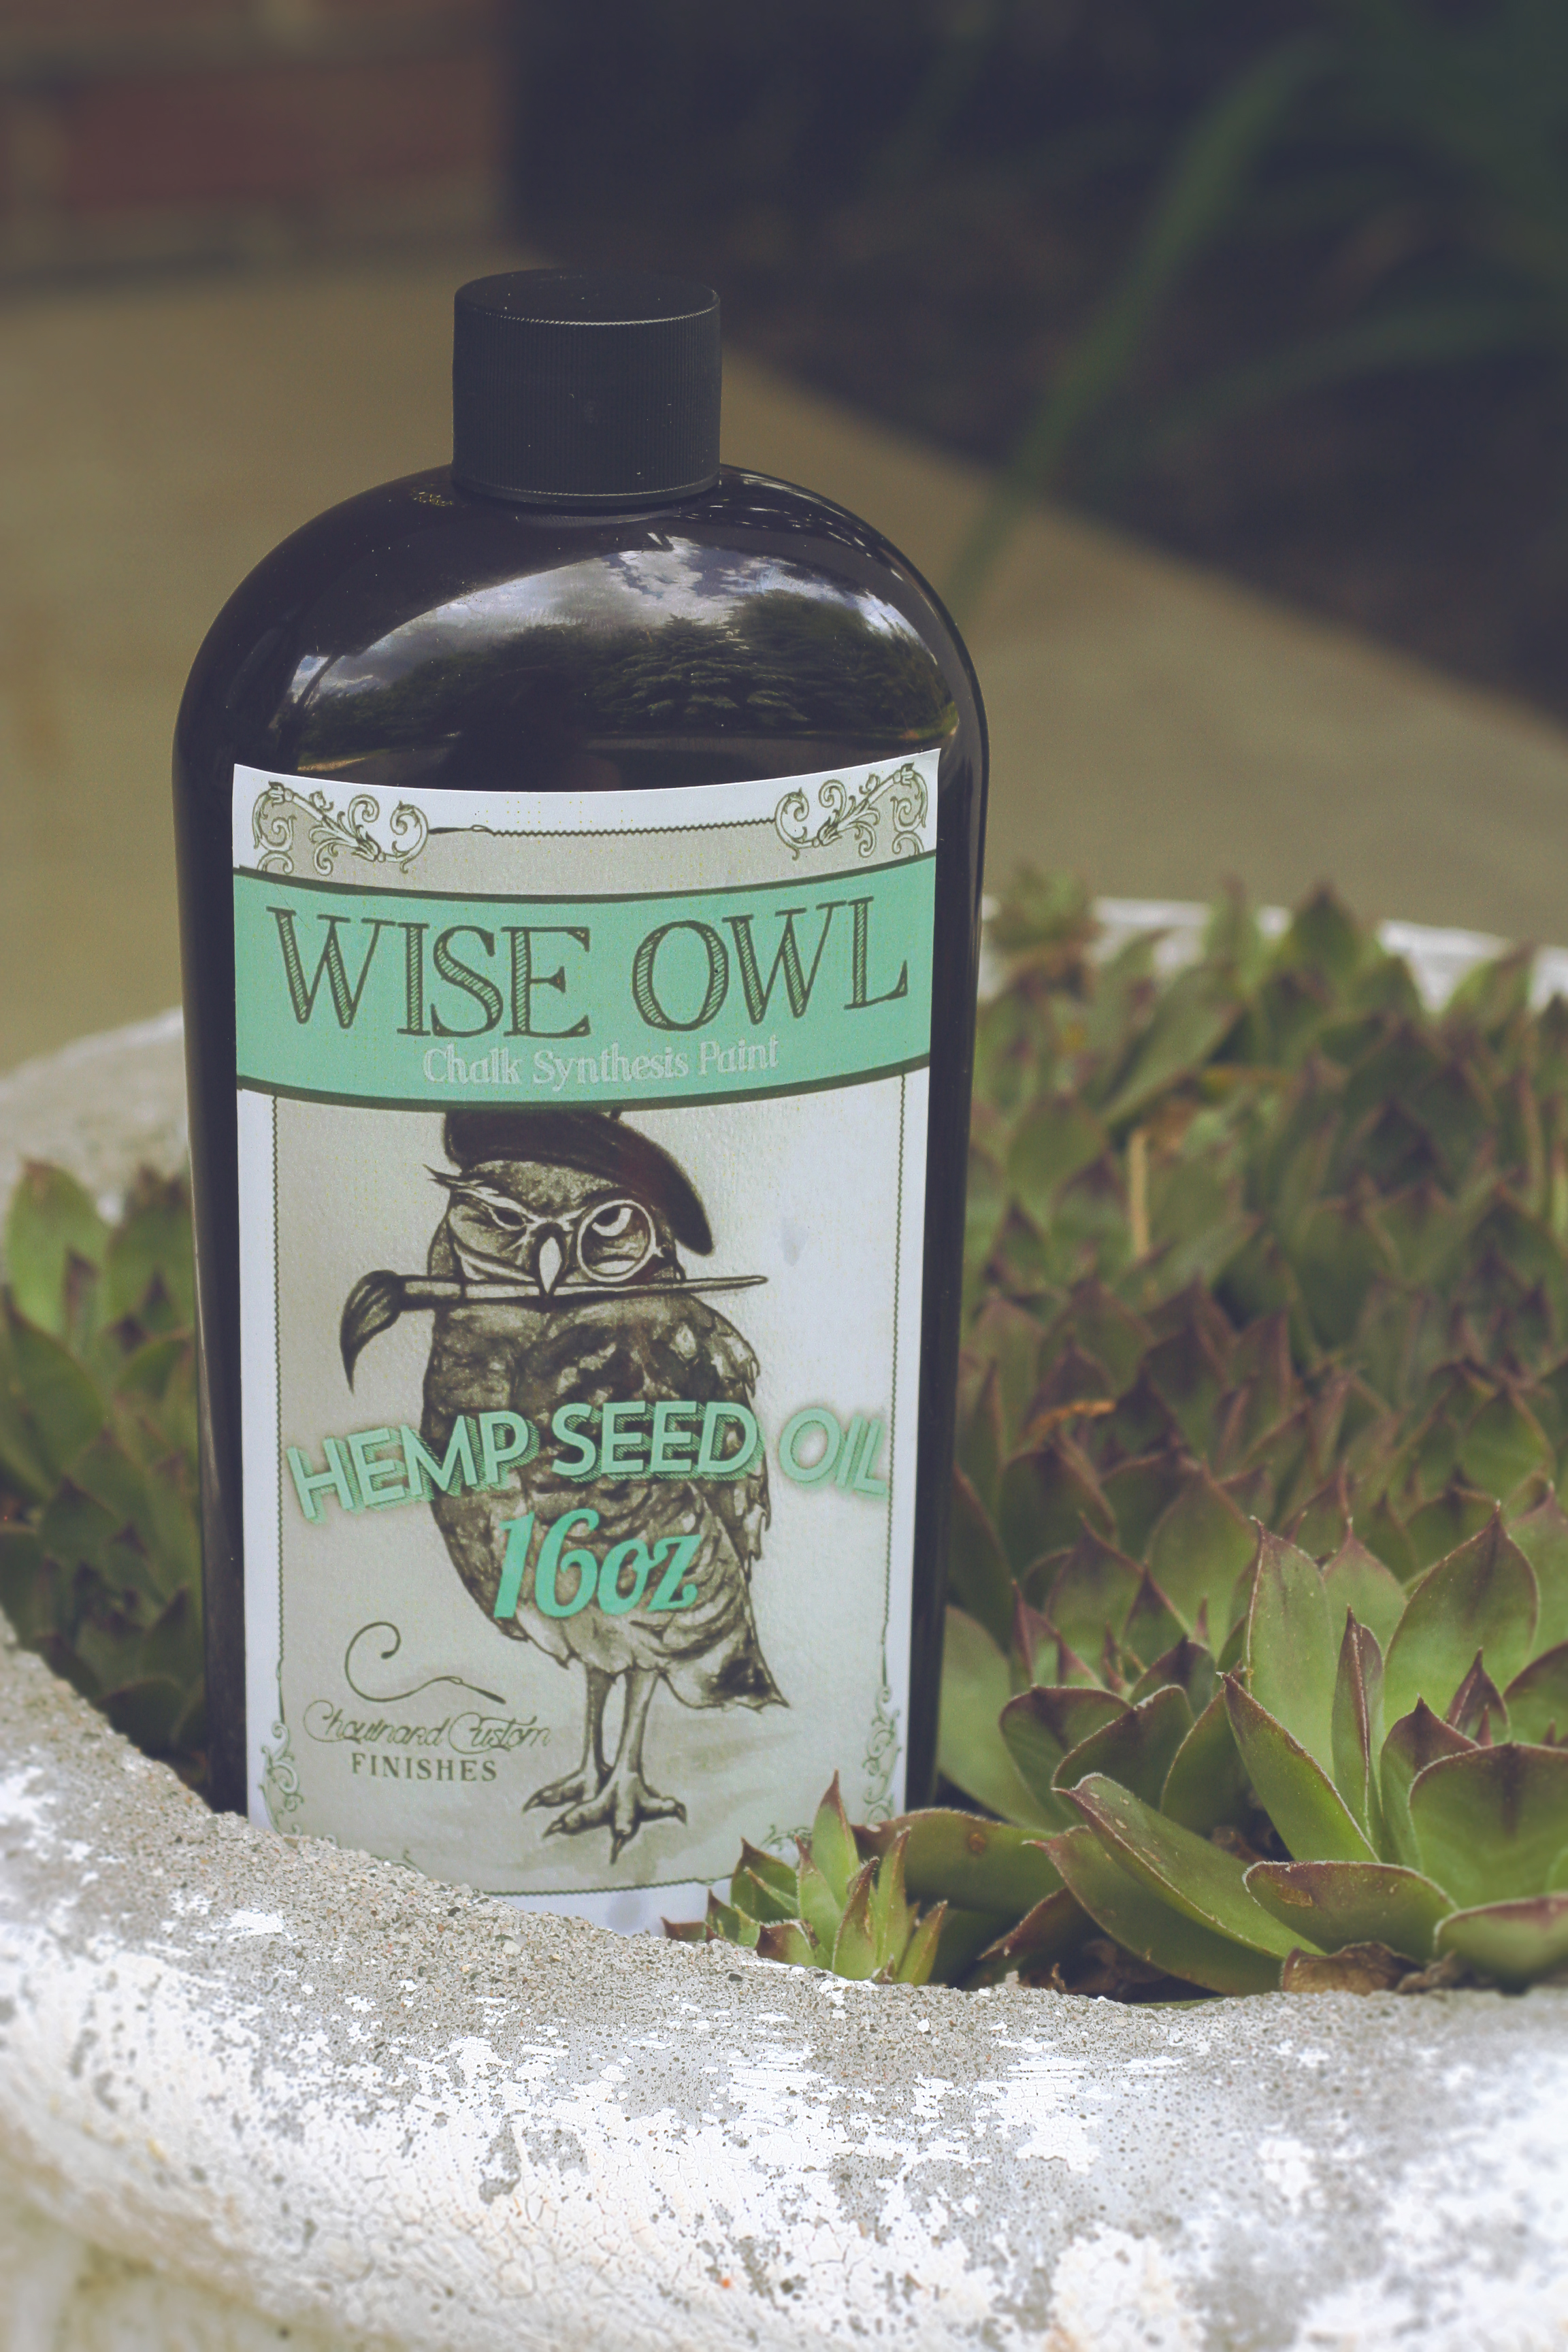 To wet sand with hemp oil- This process cuts out a couple steps since you are sanding, distressing, and sealing in a single step. Once your paint is fully dry apply hemp oil in small sections. You may apply with a paintbrush, a sock, applied directly on the sanding block or paper, or squirted right on your painted piece. Once applied, sand the oil into the surface of the paint working in circles. If a distressed finish is desired, use the hemp oil and sand paper to remove paint where you would like to distress. This can create a dimensional look unlike sanding alone. Once you have sanded, buff well with a lint free cloth. Make sure to remove all surface hemp oil until it no longer feels tacky or wet at all. If you leave too much hemp oil on surface, it will become sticky as it cures and hardens. If any part of the finish looks uneven, then the hemp oil was not able to fully saturate the paint. Just apple a little more, sand lightly and buff off. A little goes a long way but you want to make sure the paint and wood can absorb enough oil to ensure a strong and even protective finish. The hemp oil will harden within the paint within 2 weeks-30 days. The process of curing happens as the oil emulsifies with the paint and becomes hard similar to tung oil. The advantage to hemp oil over tung oil is it never spoils over time. If shouldn’t need additional hemp oil for protection but if you feel it needs a light sprucing up, you may apply with a rag and buff lightly. This is especially helpful with outdoor pieces. You may still wax over hemp oil if you desire color from a wax finish, but it will not absorb as heavily as a painted alone piece and would be a subtle finish.
  Glaze: Glaze adds a unique antique finish to painted pieces. If you desire a less uniform look than paint alone, or have a piece with lots of detail, glaze may be a good choice for your piece. Our Black Walnut Glaze is a favorite and adds a rich dark brown patina to pieces. You may also glaze over a surface finished with polyurethane, or over a raw wood finish as an alternative to a gel stain. To glaze over paint, sand well! This is one time when it is absolutely necessary to create a smooth finish before beginning. Sanding your paint will close some of the pore space so the glaze will absorb in a more uniform finish and allow the glaze to glide over when wiping away. To apply glaze, work in small sections. I recommend practicing on a smaller piece or frame before taking on glazing a huge piece as you perfect your desired technique. Apply the glaze in the direction you painted, with a sock or a paint brush. After applying, immediately wipe away glaze until desired finish is achieved. Work quickly and do not try to wipe glaze after it has begun drying. Remember, glaze will remove glaze so if you overlap over glaze that is in the process of drying, you can pull up some of the glaze. This is ok, but to get a more uniform look, quickness is key. If you aren’t happy with an area you have glazed, you may add a little more glaze and wipe away to remove some of the previous finish. Allow the glaze to settle and stay in areas with detail to add a dimensional look. A second layer of glaze may be added once dry if more dramatic finish is desired. You can apply with a sock on your hand and wipe off with another sock on the other hand for quick easy application. Our glaze itself is a strong sealant, but depending on the amount of glaze left on surface, you may need to apply a wax or polyurethane for extra protection. Our glaze can be painted over once dry without any issues should you decide to change the finish.
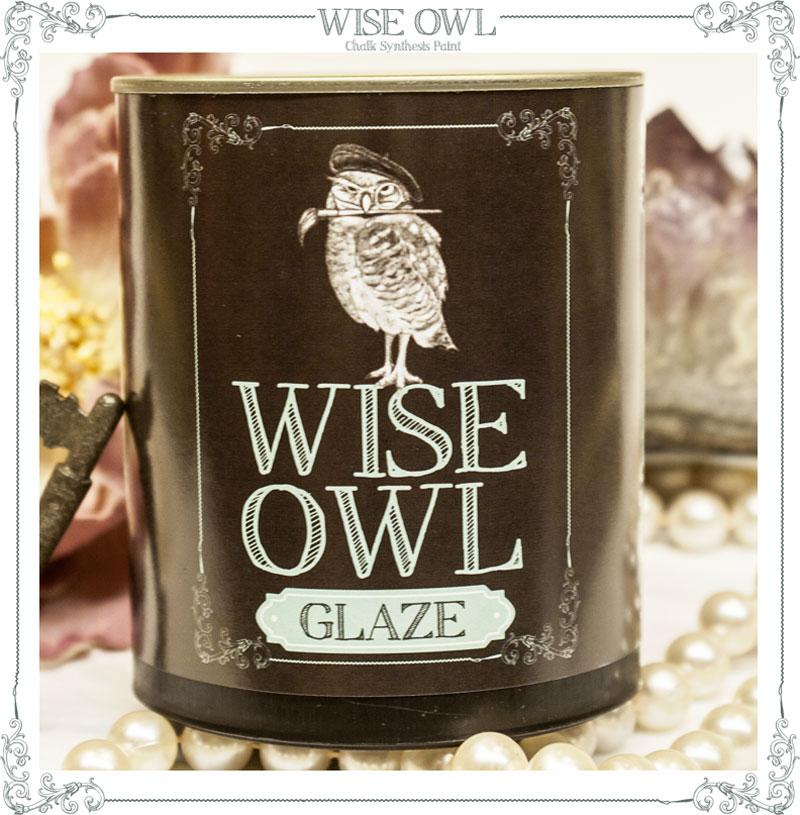

Wise Owl’s Matte and Satin Varnish
Our topcoat is unlike any other water-based topcoat. Our varnish formula is truly revolutionary. We utilize a crystal clear resin to yield serious protection that will not yellow or discolor whites due to the crystal clear technology. Our Varnish provides industrial grade strength suitable for cabinets and high traffic areas. The matte varnish is a truly flat finish to preserve the matte quality of Wise Owl Chalk Synthesis Paint and the Satin Varnish has a slight sheen. Apply in thin even coats and allow adequate dry time in between coats. Try using a Cling On F50 or F40. or F30 bush to apply for the smoothest finish.Self leveling

Non-yellowing
Non streaking
Crystal clear
Serious protection
There are so many finishes you can create from our line and I will start adding more tutorials soon featuring color washes, dry brushing, decoupage, stenciling and more so stay tuned and as always, Happy Painting! Karen Chouinard Wise Owl Chalk Synthesis PaintShare :